Guest blog post by Rhoda Toynbee
Using Google Classroom can streamline the tasks of assigning, collecting, grading, and returning student work. It saves hours of time and eliminates those dreaded piles of papers that need grading (you know the ones that mock you from the corner of your desk). One major bonus is of digital work and management is that you only need access to the internet to work on assigning and grading. Your huge teacher bag full of papers and workbooks will start collecting dust.
You will need to establish a routine for assigning and grading digital work. It can be just as daunting and overwhelming as traditional grading if you don’t have a method for wading through it all. Google Classroom is a tool, just like your grade book or textbook. How you use it will determine your success with it.
Organizing Your Google Classroom Content
Organize your content by folders (subject, month, topic) so it’s easier to access the activities you plan to assign. Most things that you assign in Google Classroom will come straight from your Google Drive. If you have a great system for organizing the content, the following year with your next class will be a breeze.
Does your school purchase the “digital” version or CD version of your textbooks and worksheets?
You can access these and then save the page as a JPG (picture format) to your drive or desktop. Next, open Google Slides and set your page size to 8.5 x 11 inches (regular paper size). Right-click on the slide and click “format background”. Instead of choosing a color, you can insert an image. Select the worksheet you want to assign, and it will become the background of the slide.
This ensures your students can’t move the page around or accidentally delete parts of it. They can still delete the slide though, so you may have to reassign the lesson to that particular student. Once you teach your students to create text boxes, they will be able to complete assignments and submit them all digitally.
Pro Tip: Turning all your worksheets into Google Classroom is time-consuming, and it’s not a true “integration of technology”. It’s a great paper saver as well as an organizational tool, but if an assignment is a “fill in the blank” digitally, that isn’t any different than a “fill in the blank” on paper. Maybe pick and choose the main resources you would like to present within Google Classroom and start by only converting those worksheets over to digital assignments. There are true interactive and integrated lessons on Teachers Pay Teachers that you can try as well.
Sharing Links and Resources
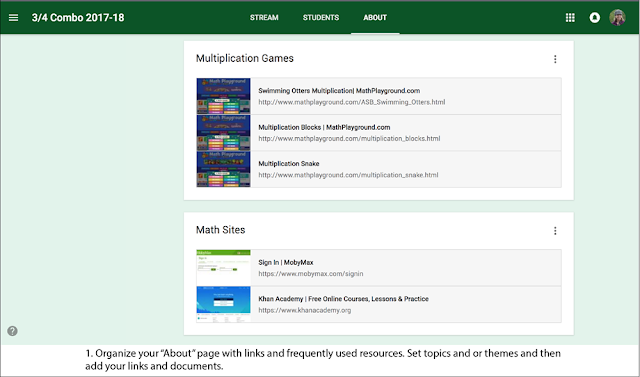
There are two ways to assign links to websites. You can create a “link” as an assignment and send it to all your students to access. This also works for videos that you want your students to watch for a lesson or additional information. If it’s a link that you will be using frequently, then you may want to consider adding this to the “about section” of your class. This is a great place to add typing websites, learning platforms, or websites that your students need to access on a regular basis. Don’t overuse this feature, but definitely put some information here to save yourself time.
Keep Your Google Classroom Feed Clean
The Google Classroom feed can become very busy and overwhelming if you are assigning multiple things each week. Deleting older assignments that you have graded is a great way to keep the feed clean and easy to navigate. The exception to this would be assignments that you will repeatedly assign and that won’t be changed much. These assignments can be re-used and posted again, and that includes the option to re-use them the following year. How you manage the feed is a personal preference. If you want to re-use things, then setting them up in a way that they can be quickly edited and re-used the first time you assign them will save you time later.
With younger students, it’s better to not “return” the assignment after you have graded it. This will clutter up your students’ feed, and they won’t understand why you are sending it back. They can view the grade, but it’s obscure and they probably won’t spend the time to check it. Returns can be reserved for those assignments that need corrections only. This way your students will know that if an assignment is back in their feed and not marked “done” that they need to improve the quality before they submit it again.
More Google Classroom Management Tips
Email Tips – Use the email feature if you have older students. It’s not a feature you will want to bother with for the younger grades. You will also want to decide your preference for email notifications that are sent to you when a student marks an assignment as “done.” With a class of 20-25 emails, your inbox will fill up SUPER fast if you get a notification each time a student finishes their work. There are 3 lines (the burger icon) in the top left of your Google Classroom window. Select “settings” at the bottom and then mark your email preference in the checkbox.
Online Discussion Tips – Students have the ability to start a discussion on an assignment. The display is similar to a forum or a chat window. You can choose to let them use this feature or incorporate it into some projects as part of their collaboration. You will definitely want to teach a lesson on classroom expectations and digital citizenship before you do this. You have the ability to mute discussions if they can’t keep the discussion on topic or if they only want to use the discussions for meaningless chat.
Grading Tips – If you have an online grading platform, it may or may not integrate with Google Classroom. You will have to do some research to see what your options are for your specific program. A workaround for any program is to open your grade book program in one window or tab and then shrink it down to one half the size of your monitor. Next, open up your Google Classroom grade list and shrink that tab or window down to fill in the other half of your screen. Now you can glance at your Google Classroom grades as you quickly add them to your grading program.
Keyboard Shortcut Tips – Teach your students the magic of Command/Control Z. The first time they start to panic because they have deleted a page in the slideshow or a long passage, that they just spent 20 minutes typing and you mysteriously hit the “undo” button, they will be amazed. After that, you can teach them how to do the same keyboard shortcut to undo their mistake before they panic, and they will be forever grateful. While you are at it, teach them to copy and paste as well. They will need those skills as they progress through their digital careers and the sooner they learn them, the more efficient they will be.
Teach yourself the magic of keyboard shortcuts as well. Keystrokes are more efficient than moving your hand back to a mouse and then having to relocate your cursor onto the next box. For example, while you are entering grades for assignments, you can use the down key to move the cursor down to the next student.
Becoming Proficient with Google Classroom (and a Freebie!)
The program is most effective when you assign digital work and activities in Google Classroom a few times a week. If you want your students to be proficient at using technology, they need to use it on a regular basis. You need to be using it yourself and interacting with it as well if you hope to become proficient with it.
You can start with free resources like my Google Slides Math Task Cards Review. This set of slides can be used for whole group review, small group discussion and practice, or individual assignments. If you assign the set to all students in your class, they will need to mark “done” when finished. You will be able to see at a glance who has turned in their assignment and who still needs to. To grade their slides, open their submitted presentation and view their answers. The easiest way to mark them is to turn an incorrect answer red (or the color of your choice).
Use this freebie or other resources to practice assigning and implementing different assignments through Google Classroom. The more you use Google Classroom, the more you’ll discover about what you can accomplish with this amazing program.
Rhoda Toynbee is a classroom teacher who creates educational resources. She blogs about teacher life and shares tips for teacherpreneurs at Rhoda Design Studio. Finding a balance between school, raising two children, and being creative is important to her. Part of that balance is found while “being techie” on her laptop and learning new things. Living in rural Montana provides ample opportunity for learning time and play time. Rhoda enjoys riding dirt bikes in the summer and finds it to be a great way to gear up for the next school year.

