How to Teach Social Skills, Step by Step

Seating students together is not enough to ensure teamwork. Many kids have very little idea how to interact appropriately with their classmates. They simply lack the social skills needed to perform the most basic cooperative learning tasks. Lack of social skills is probably the biggest factor contributing to lack of academic success in teams. Fortunately, social skills can be taught just like academic skills. If you use a systematic approach like the one described below, you’ll find that your students CAN learn how to interact appropriately and become productive team members.
Listen to the Podcast: How to Teach Social Skills for Working Together
For more information about how to teach social skills, listen to Episode 7 of my Inspired Teaching Made Easy podcast below.
Six Step Process for Teaching Social Skills
1. Discuss the Need for Social Skills
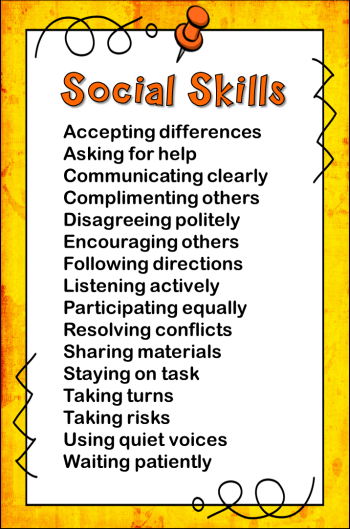
Before you can help students improve their social skills, they need to understand why these skills are important. You might begin by asking your students to think about problems they may have experienced when working in groups, such as team members not listening to each other or not taking turns. Explain that most of these problems are caused by poor “social skills,” sometimes known as “people skills.” You might even mention that sometimes adults need to work on their social skills, too! Brainstorm a list of social skills that might make it easier for students to work together in teams. If they can’t think of any social skills for working together, share some of the suggestions from the list below.

2. Select a Social Skill
Even though your students may need to work on several different social skills, it’s best to focus on just one skill at a time. You can start with the skill you feel is most important, or you can let your class decide which skill they need to work on at a given time. I like to start with “Praising,” which might also be stated as “Showing Appreciation,” because when kids master this skill, all of the other skills are easier to learn.
3. Teach the Social Skill
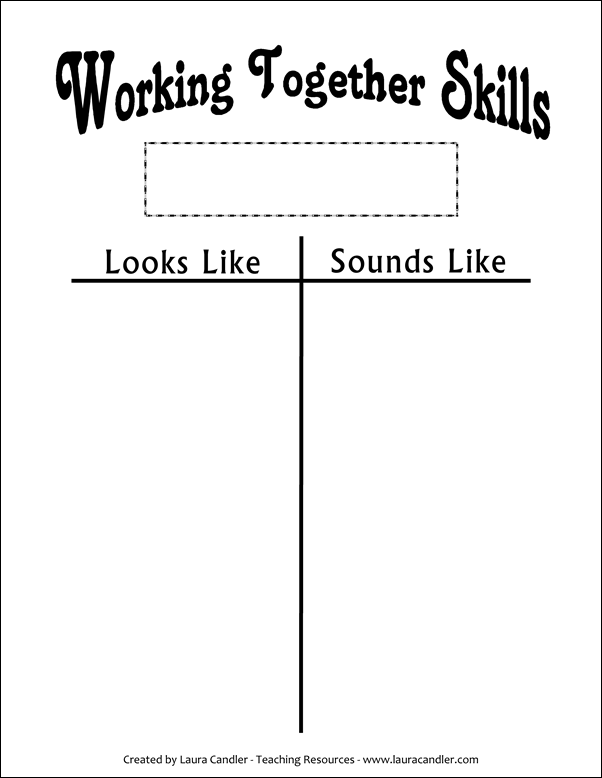
Step 3 is to teach the skill explicitly so that your students know exactly what to do and what to say in order to master the social skill. For this part of the lesson, you can use the Working Together Skills T-chart below by projecting it on a whiteboard or drawing it on anchor chart paper.
Write the name of the social skill in the box at the top of the Working Together Skills chart. Then ask your students to help you brainstorm what they might do and what they might say when demonstrating the social skill. Write what they might DO under the Looks Like heading because this is what the skill looks like when it is demonstrated. Write the words they might SAY under the Sounds Like heading because this is what the skill might sound like to someone who is observing the activity.
Examples for the social skill of Praising:
Looks Like: Thumbs up, Clapping, Smiling
Sounds Like: Terrific! I knew you could do it! Way to go! I like the way you…
4. Practice the Skill
After you complete the Working Together Skills chart with your students, it’s important to have them practice the skill right away by participating in a structured cooperative learning activity. For example, if you taught Active Listening as the social skill, you might follow up with a team discussion activity in which students take turns answering questions or sharing ideas around the team. Here a a few suggestions for cooperative learning structures you can use to practice specific social skills:
Social Skills and Cooperative Learning Structures
|
Social Skills |
Structures for Practice* |
| Active Listening | Roundrobin, Think-Pair-Share, Mix-Freeze-Pair |
| Praising | Rallytable, Roundtable, Pairs Check, Showdown |
| Taking Turns | Rallytable, Pairs Check, Roundtable |
| Using Quiet Voices | Think-Pair-Share, Numbered Heads Together, Showdown |
| Staying on Task | Rallytable, Roundtable, Pairs Check, Showdown, Mix-N-Match |
| Helping or Coaching | Rallytable, Pairs Check, Showdown, Mix-N-Match |
| Using Names | Mix-N-Match, Mix-Freeze-Pair, Showdown |
5. Pause and Reflect
Sometime during the practice activity, use an attention signal to stop the class. Ask them to think about how they’ve been using the social skill. If you have observed teams or individuals doing a good job with the skill, share your observations with the class. Challenge students to continue to work on their use of the social skill as they complete the activity. Refer to your Working Together Skills T-chart if students have forgotten what the skill Looks Like and Sounds Like.
6. Review and Reflect
At the end of the activity, reflect again on how well the social skills were used. Take a few minutes to discuss the positive interactions that were happening, and aspects of the social skill that still need work. This is a also a perfect opportunity for personal journal writing and reflections. Consider these writing prompts:
- How well was the social skill being used on your team? What specific examples do you remember?
- How did you personally use the social skill? What did you do and/or say? To whom?
- How might you improve in using this skill next time?
By the way, it’s not necessary to follow all six steps every time you teach a new social skill. The most important elements are explicitly teaching of the skill and immediately following the instruction with a cooperative activity to practice the skill. The reflection steps are important and should be included as often as possible, too.
Modification for Younger Students
Younger students or special needs students could benefit from watching an excellent video created by Model Me Kids called Time for School. This video shows students exactly how to perform specific social skills. Even if you don’t use the video with your students, you might be interested in viewing it yourself to see how social skills can be broken down into steps and taught. If the video is appropriate for your students, they could watch it before completing the Working Together Skills chart above.


